
The guest post this week has been written by pianist, teacher and author Rami Bar-Niv. Here, he discusses the important topic of sight-reading in relation to note reading and rhythmic understanding.
You learn to read music like you learned to read your language, and then you just read it.

Furthermore, I claim that if you can read music, you can sight read music. That is of course, providing you play your instrument at the appropriate level.

My mother taught me to read music and she did a great job.
I adopted my mother’s methods, and students who started learning the piano with me from the beginning are also great music readers.
To me, reading music starts from the first lesson. I present the full grand piano staff that includes the two clefs in the two staves. I explain that we write the notes on the lines and in the spaces.
I teach the directions of up and down.
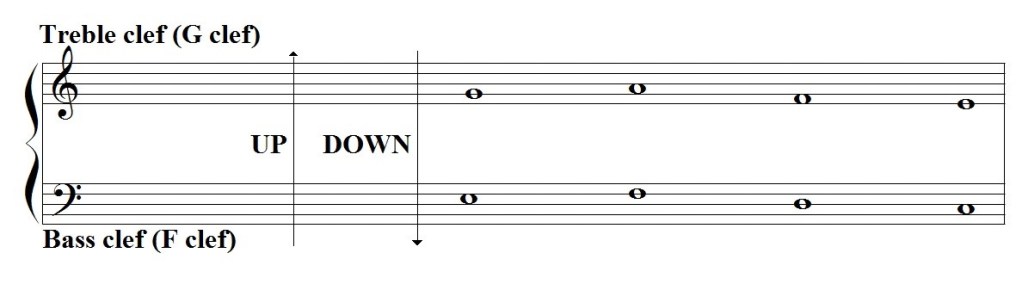
It is important to relate the up and down directions in the music notes to the keyboard: up in the notes is to the right on the keyboard and down in the notes is to the left on the keyboard.
I present steps (the intervals of seconds) and skips (the intervals of thirds), regardless of what notes they are.
In written music, steps are line to space or space to line (different), and skips are line to line or space to space (same).
For note recognition on the page, landmarks (also called guide notes) are the way to go. The first landmark is middle C, and it can be written three different ways: in the center of the grand piano staff, closer to the bass-clef staff, or closer to the treble-clef staff.
I present the right hand, the left hand, and the finger numbers.
In the first lesson I teach five notes stemming from middle C: C, D, E (for the treble clef and right hand) and C, B, A (for the bass clef, and left hand). We name them, we sing them, we play them with fingers 1, 2, 3, of each hand respectively, and then we do it all simultaneously.
I give written homework: write “St” for step or “Sk” for skip or “same” between the notes, mark the direction between the notes with an arrow, and name the notes we arrived at. I start with 3-5 notes, and then add more and more newly learned notes.

I count the lines and the spaces on the grand piano staff (the full piano system) from the centre (middle C) outwards, thus creating a mirror image. This way some of the landmarks mirror each other.
For example, C, one octave above and C, one octave below middle C, are in the third spaces.
Another octave up and down (respectively) and they are on the second ledger lines.
The second lines mark the clefs: the belly of F clef (bass clef) is on the second line – the one that is surrounded by the two dots, and points to F; the belly of G clef (treble clef) is on the second line and points to G. Sometimes for fun I mark that also with 2 dots around the line of the note G.

Anywhere on the piano staff, G mirrors F and F mirrors G.
My mother named the G in the space on top of the grand staff Sunny G and drew rays around the note. Its mirror, the F in the space under the grand staff, was Moony F with a smiley face inside the note.

But naming and recognising the notes, as proficient as it can get, isn’t yet proper music reading. Here is where intervallic reading is needed, and of course the understanding of the up and down directions of moving from one note to another.
So, I start with a step (a second) and a skip (a third), regardless of note names. Then over time, I expand to a fifth which is two skips, a fourth that is a step and a skip or a skip and a step, a seventh that is three skips, etc. Normally, if not indicated otherwise, we look at intervals from the bottom notes upwards. Using the terms skip and step proves very useful here, as I don’t have to explain to the student why two thirds make a fifth (and not a sixth)…
Now you start to realise that all intervals are actually built of a number of skips (thirds) with or without one step (second). Furthermore, all odd-numbered intervals are line to line or space to space and all even-numbered intervals are line to space or space to line.
Once you can read intervals horizontally and vertically, you start looking at relationships between notes that are further apart; for example, the next measure starts a step higher than the previous one, as we see in exercise no. 1 by Hanon.
Then you start to read chords. Chords are read according to their shapes and altogether there aren’t that many different chord shapes. For example, a triad (three-note chord) will have three shapes: root position, first inversion, and second inversion. The root position is made of two thirds and the inversions are made of one third and one fourth in different orders. A trick to quickly recognise the root of the inversion: it’s the top note of the interval of a fourth.
A seventh chord (four-note chord) will have four shapes: root and three inversions. A trick to quickly recognise the root of a seventh chord in inversion: it’s the top note of the interval of a second.
There’s no need to figure out every note in a chord or in a passage; start seeing shapes of chords and patterns of horizontal movements, like a drawing of a skyline. Recognise scales, arpeggios, patterns, sequences, etc. One has to learn theory, of course, to apply a key signature as well as accidentals to the music that’s being read.
Already from the first lesson, my students play and sing the names of the notes when playing quarter notes (crotchets). When playing a half note (minim), they name the note and add the number “two” for the 2nd beat of the note. Of course, all done in a steady rhythm. As they advance, they’ll sing the note name + 2 3 4 for a whole note (semibreve), and the note name + 2 3 for a dotted half note.
Eighth notes or quavers we count 1 & 2 & 3 & 4 &. Sixteenth notes or semiquavers: 1 e & a 2 e & a, etc. I often count semiquavers simply as 1, 2, 3, 4, or as in ballet classes 1, 2, 3, 4, 2, 2, 3, 4, 3, 2, 3, 4, etc. Sometimes I also use the student’s name for the semiquavers, providing it has four syllables, for example, Ra-mi-Bar-Niv. There are also the popular Ti Ki Ti Ki, Tah Fah Teh Feh which is a whole counting method on its own, and other similar counting methods. The important point is to say something and hear something for each sixteenth note or semiquaver.
I always count in full and recommend doing it also for larger note denominations. for example, for a crotchet and two quavers I’d count 1 & on the crotchet, and 2 & on the two quavers, rather than just 1 on the crotchet and 2 & on the two quavers.
For a crotchet and four semiquavers I’d count 1 2 3 4 on the crotchet, and again 1 2 3 4 for the four semiquavers, or any other method, as long as I say something for each semiquaver within the crotchet too. This way, the larger note denominations do not get shortened by the student.
If you break down everything to four semiquavers per crotchet, you’ve covered most of the existing music. This includes also music that seems rhythmically tricky for example, Gershwin’s Prelude No. 1.
I count 6/8 time signature as 1 2 3 4 5 6, or twice 1 2 3. The 6/8 time signature can be helpful in explaining 2 against 3, and indirectly also triplets, though triplets alone may be felt more naturally by simply fitting three notes into the beat instead of two. I show 6/8 time signature “overlapping” a 3/4 time signature: the counts of 1 and 4, represent the “2” of 2 against 3, and the counts 1, 3, and 5 represent the “3”.
Always look ahead in the music and as much as possible don’t take your eyes off the music. Looking ahead in the music means that you do not stare at the spot you’re actually playing, but you constantly look at what comes next. It’s like driving a car or riding a bicycle; you look forward at the road ahead of you, and not at the road that’s under the wheels…

Understanding the relationship and connection between the notes makes good sight reading.
Of course, one should have an adequate playing technique to be able to realise the sight reading into actual piano playing.
Good music reading starts with the first lesson and continues with every new piece. There is no need for any sight-reading books or isolated flashcards. Just sight read your next assigned piece.
If you want “sight-reading materials”, play through the vast repertoire of chamber music and duets.
Once you have a good foundation, the more music you read, the better you become in reading music.
Enjoy it all!
Blood, Sweat, and Tour: Notes from the Diary of a Concert Pianist
