
Today’s post is the second in a series of articles focusing on piano technique written by guest writer Rami Bar-Niv. Rami is an Israeli pianist, teacher, writer, and composer based in the US. Here, he discusses the importance of wrist circles.
Wrist Circles is one of the important piano-playing techniques. It enhances legato, phrasing (also in non-legato and staccato), scales, arpeggios, broken/rolled/spread chords, evenness, small and big leaps, double octaves, chordal work, and more. All that, while keeping your hands free of any stress and injury – it’s just magic.
Why circles? Perhaps the example of running towards a wall and instantly changing direction will give a partial explanation and reason. When we need to change direction sharply (a 180 degree turn) we are better off smoothing the turn with “hitting” the wall in a little sideways angle rather than crushing into it in a 90 degree angle. When we do so, we are drawing a partial circle or oval with our body.
Wrist Circles are also referred to as Wrist Ovals. Depending on the musical text, the circles can become ovals. For example: if you use this wrist movement for playing C-E-G-E-C back and forth, it will be a circle; if you use it to play C-E-G-C-G-E-C back and forth, the movement will be an oval.
You draw imaginary vertical circles with your wrists, while playing. The directions of the circles are mirrored by the hands and the wrists go down-out-up-in which means the RH wrist moves counterclockwise and LH wrist moves clockwise.
You can practice the wrist-circle movement first with just resting one finger on a single key and moving the wrist in the direction described above.
You draw the bottom half of the circle when the notes move up the keyboard in the right hand and down the keyboard in the left hand; you draw the top half of the circle when the notes move down the keyboard in the right hand and up the keyboard in the left hand.
Here are a few examples to try:
Try a pentascale (the first 5 notes of a scale) and afterwards perhaps Hanon exercise No. 1. I recommend that any such exercises would be done one octave away from middle C in order to avoid hand twisting (ulnar deviation). Finger 3 in the right hand marks the lowest wrist point on the way up the keyboard and the highest wrist point on the way down the keyboard. In the left hand it’s the opposite, finger 3 is the lowest wrist point on the way down the keyboard and the highest point on the way up the keyboard. Fingers 5 and 1 mark the turning points on the keyboard which are also the points where the bottom half of the circle connects with the top part (finger 5) and the top half connects with the bottom half (the thumb).
Also try a triad arpeggio like C-E-G-E-C with fingers 1-3-5-3-1 in the right hand, and G-E-C-E-G with fingers 1-3-5-3-1 in the left hand.
You can do all the above in legato or in any sort of non-legato articulation and staccato.
It takes time getting used to this technique, so I suggest not trying a parallel movement of both hands for a while. A parallel movement of the hands means the opposite movement of the circles: when the right hand draws the bottom half of the circle the left hand draws the top half of it…
This is the basic idea and it works in various other situations. e.g. leaps: use the same directions of wrist circle which will become here ovals. You can use it for leaps between single notes, chords, double octaves, and any other note combinations. If you jump up in the right hand 2 octaves (or any other distance), regardless of what fingers you use, do the gesture of the bottom half of the wrist circle. If you jump up in the left hand 2 octaves (or other distances) do the upper half gesture of the wrist circle.
Wrist circles are very useful in situations where the left hand has bass notes or octaves alternating with chords above. We find these in Ragtime, Marches, Nocturnes, Waltzes, and other styles.
Play the bass note or octave starting with a low wrist and moving upwards and towards the chord while drawing a little upper bow with the wrist. Land on the chord with wrist moving down and starting its way back to the bass with a little lower bow (concave). When you reach the bass note your wrist is still low and now you can play it with the same initial movement of raising the wrist. These movements amount to wrist ovals.
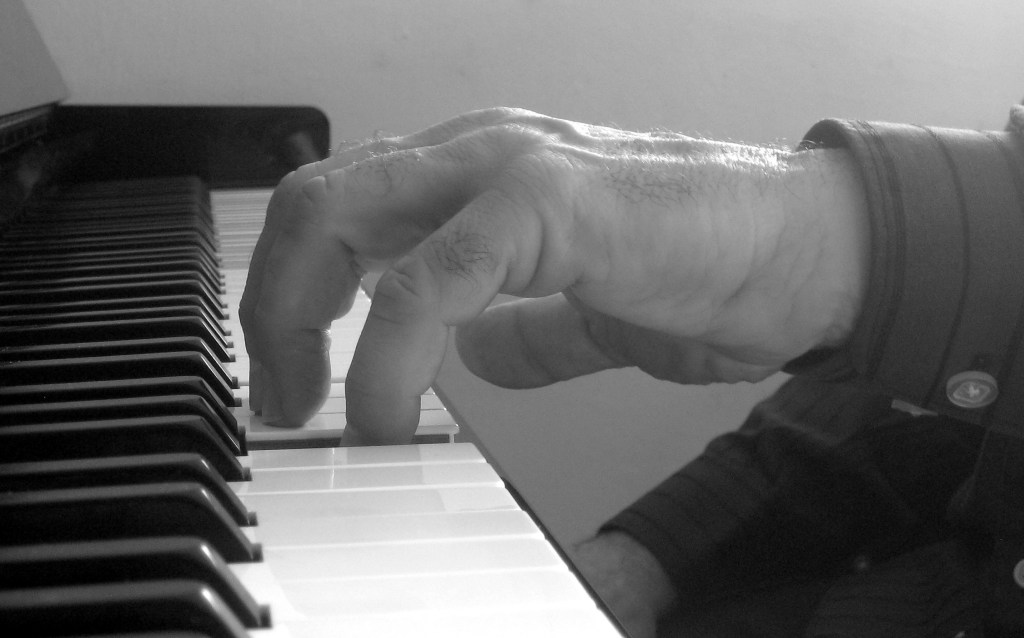
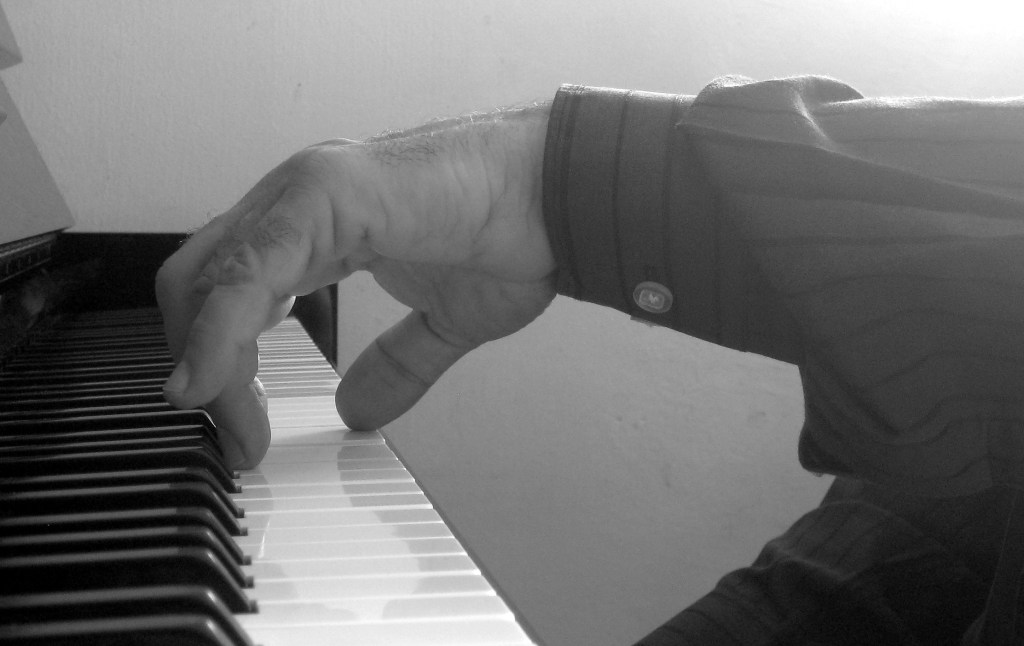
Here are photos and a quote from my book The Art of Piano Fingering. These photos illustrate wrist circles in the case of big leaps in the LH.
“Play the bass notes with the wrist moving from the bottom up (the next top three photos, left to right), and play the chords with the wrist moving from top to bottom, thus creating wrist circles (bottom three photos, left to right).”


Obviously, for fast playing and for distant leaps the movements become smaller. Sometimes the movement does not show at all to a bystander.
I recommend practicing first slowly and using the full movement to draw as large an imaginary circle as possible, however, very gently. At any sign of fatigue or discomfort, I recommend to stop and come back to it later even gentler than before.
Also, often just thinking of this movement will already be sufficient.
Of course, sitting properly at the piano with forearms more or less parallel to the floor is taken for granted.
I hope this article is helpful.
With beautiful-music best-wishes,
Blood, Sweat, and Tour: Notes from the Diary of a Concert Pianist
thanks for sharing this article on circles/ovals in piano technique! Very appropriate description of very useful material. Thanks so much. Rodrigo
Hi Rodrigo, many thanks for your comments. I’m glad that you have found it useful. Melanie