
In my previous Tricky Corners post, I focused on fifth finger leaps within a passage from C P E Bach’s Sonata in A flat, H. 31 (first movement, Un poco allegro); you can read the article, here. Today’s post will continue with this piece, looking, this time, at another caveat which can present serious issues for many a student, namely, the smooth placement of fingers creating even passage work, or keeping semiquaver passages from rushing, running away or speeding up, whilst being still able to phrase effectively and expressively.
As so often when small sections are dissected, the passage on which we will focus on today looks pretty innocuous, but when strung together with the following bars (9 – 12), all with similar fast moving, leaping semiquaver passage work in the right hand, combined with non-legato quavers in the left-hand part, it makes for the perfect tricky corner!
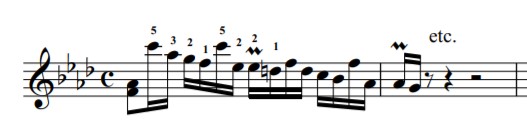
Here’s the whole passage:
Ex. 1
As we had already worked in isolation on the leaps present during this passage, we were now ready to tackle the remaining passage work.
Here’s the section causing grief, which is taken from bar 8 of the first movement (Un Poco Allegro):
Ex. 2
Employing the fifth finger twice on the top Cs, particularly when moving on to the E flat with the second finger at speed, caused repeated inaccuracies and instability. And the placing of the third finger on the A flat was surprisingly uncomfortable, too. But we eventually settled on the fingering in Ex. 1 above, after having experimented with several different options.
So, how to encourage swift but even movement with active fingers at speed? Here are a few ideas which we explored during the lesson.
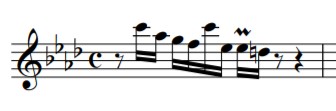
It can help to use elongated note patterns which are slightly disparate to those written. This might appear odd, but when practising any demanding passage, exaggeration and note ‘additions’ will generally make the original passage feel that much easier. To this end, we worked at the following, setting the ornament aside for the time being:
Ex. 3

First of all, adding a triplet figuration, which allowed the rogue top C to be played several times, provided the opportunity for my student to ‘observe’ how she was negotiating this note, aligning her fifth finger optimally, and, if it wasn’t played ideally the first time round, there was then the opportunity to correct it; this was really important during the interval of a sixth, from the C to the E flat, too. We found that the best finger position, to sound the note fully, without rushing or pushing the pulse at all, was to use the very top of the fingers, or the finger-tips, as is frequently the case. The addition of fully ‘engaged’ finger joints was also imperative, particularly that nearest the finger’s tip; this joint helps facilitate so many fast passages, and if it’s not in a slightly ‘hooked’ position, it has a tendency to ‘collapse’ rendering the finger fairly powerless.
The act of drawing attention to a certain note or note figuration within a passage is extremely beneficial, as the reason why many falter during faster note patterns, is simply because they have tended to ‘skim over’ such passage work without paying close attention to ‘how’ the notes are being played physically, and the necessary finger, hand and wrist positions needed to play them in a relaxed manner.
Leaving my student to work at this in her own time, we moved to this next exercise, which was played at a very slow speed:
Ex. 4

‘A’ contains the same note patterns as Ex. 3, but with different touches or articulations – another useful method of drawing attention to ‘how’ the fingers are connecting with the keys. Similarly, ‘B’ is more of a finger twister, again with varied touches. We aimed to make quite a differentiation between the heavy touch of the accents, and the lingering touch of the tenuto markings, not forgetting the short, spiky staccato, which is best played with the top of the finger moving inward very swiftly for a quick yet sharp connection with the key surface.
Then we worked at each finger, alone:
Ex. 5

This exercise, which might appear strange and ‘out-of-context’, can be practised very slowly and steadily, watching finger placement as the notes are depressed. The use of the same finger for each group of four semiquavers emulates those found in the passages, but the leaps, which are not too tricky at slow speeds, demand focused concentration and careful finger and hand coordination. If you wanted to take this a step further, each finger could be accented in a similar way to Ex. 4.
When returning to the passage as written, we phrased it like this:
Ex. 6
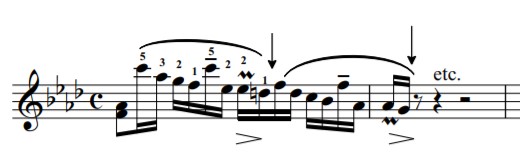
By using very slight ‘breaks’ or gaps within the phrase (marked by the arrows), my student found that she had plenty of time to move her hand in to position for the next, or second, passage, and this provided seemingly perfect ‘breathe’ control; such space within a phrase should ideally be created wherever possible, but especially when there is a struggle to find and play notes. It not only offers time to breathe, but also a means whereby to control tempo (pulling back or recovering the intended speed, if need be), and evenness. Between the F and top C (beat 2 in Ex 6), we employed a circular wrist movement, to enable a flexible movement or motion from the thumb to the fifth finger, intended to enable precise placement of the top C, with an added tenuto marking for punctuation within the phrase.
Finally, we added the ornament, which had been written into the score as an acciaccatura:
Ex. 7
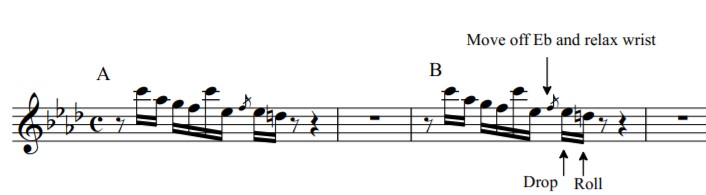
This can be articulated with a very soft, light touch on the grace note itself (the F) as in Ex. 7, ‘A’, just grazing the note very briefly before sounding the E flat with a deeper touch. As previously discussed, it might be a good idea to ‘create’ enough space and time to sound the note pattern, and to do this we experimented with a small break from the E flat, marked at ‘B’, by the arrow, coming off the note, allowing the F, of the acciaccatura, to be played lightly, followed by a very swift and brief ‘drop-roll’ or ‘drop-lift’ wrist motion from the E flat to the D natural; moving the wrist down as the first note is depressed, and ‘up’ after the second note, as marked in Ex 7 ‘B’, allowing any tension in the hand, wrist and arm to be released. Locating places to release the wrist is a vital practice tool.
Once each exercise had been thoroughly practised throughout all the four bars, or where these figurations occurred, my student felt more confident, and was able to employ a faster tempo whilst keeping each phrase smooth, even and accurate.
You can hear the first movement of this sonata, here: