
Today’s post features my latest technique article for Piano Professional, a piano teachers’ magazine published by EPTA or the European Piano Teachers Association. This article highlights the Bridge Position, which is generally considered an important hand position for pianists. I hope it’s of interest to both teachers and students.
If you cast your mind back to when you started learning the piano, you might recall being informed about basic hand positions by your piano tutor. It may have been during the first lesson, or certainly within the first few lessons. Piano teachers, particularly those teaching twenty, thirty or forty years ago, frequently espoused the necessary or ideal hand position for piano playing as similar to ‘grasping’ or holding an orange in their hand, or perhaps they may have mentioned that a suitable hand shape should be akin to that assumed when one holds a tennis ball – maybe they even provided a tennis ball for you to try it out for yourself. One of my students seems to remember it fondly as being asked not to ‘squash the hamster’!
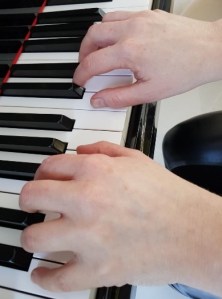
The hand position these descriptions are all referring to is more commonly known as the ‘Bridge’ position; this simply means a hand position where the knuckles of the hand are visible or protruding above the hand, that is, forming a bridge across the hand, from one side to the other, and therefore supporting a nicely rounded hand and curved fingers. In the following image (Photo 1), my knuckles are clearly sitting ‘above’ or at the top of my hand, forming a reasonably comfortable hand shape from which each finger is capable of playing independently:
Photo 1
Whether fingers actually play independently or ‘on their own’ is a moot point for many, including myself, as they never really act entirely alone, because they require much support and guidance from the hand, wrist and arm, to play accurately and produce a rich tone.
When students don’t have a formed Bridge position, their hand will tend to collapse and therefore any kind of finger power or clear articulation, will be a challenge. A common issue for students, when the Bridge position hasn’t as yet been fully formed, is that fingers literally lean on each other for support. For example, the fifth finger, left to its own devises, will tend not to function properly without employing the same tendons as those used to play the fourth finger, rendering them permanently intertwined. This can cause injury and might certainly instigate weaknesses in those fingers.
A typical ‘knock-on’ effect from this problem is when the fifth finger perpetually loiters in the air, ‘sticking-up’ instead of forming a relaxed position, and this is especially problematic when using the fourth finger. We’ve all seen students with finger positions awkwardly splayed outwards, and, similarly, if the hand is collapsed, that is, not in a rounded position supported by the Bridge, tension is generally not far away either, which is relatively simple to spot, but much trickier to alleviate.
When helping students to develop the Bridge position, the issues are multifaceted. If a pupil is young, then they are generally not so aware of these issues, which makes it easier to teach and implement, but once a student reaches teenage years, or is an adult returner, they usually know how the hand should ideally be shaped, and they become increasingly upset or anxious if their ‘Bridge’ has yet to appear, or if their fourth and fifth fingers aren’t working optimally.
I try to avoid the inevitable illusion involving the tennis ball; in my opinion, it’s not sufficient to simply talk in passing about ‘holding an orange’ and then never mention hand positions in any further lesson. Implementing such a hand position takes patience and lots of regular work, both from the teacher and student. But with conscious, focused practice and self-awareness, a student will eventually discard old habits and form a fresh newly-rounded, comfortable hand position.
In the following photo (Photo 2), my hand is assuming a position totally unsuited to playing the piano, but it is a useful position to help students identify their knuckles and think about how they might start to form a bridge:
Photo 2
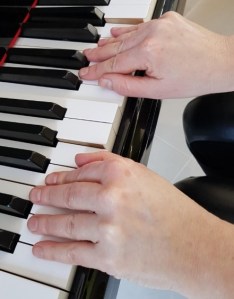
This involves keeping fingers straight, raising the hand a little, almost as though the hands are being pulled in towards the body. Pupils can then refer to this position as a means of building an awareness of their own Bridge. As with much of my teaching, I aim to accentuate movements to aid flexibility and relaxation, and if a student learns the ‘feeling’ of a motion or movement, they are usually well on the way to adopting it.
As is frequently the case, taking a problem out of context, providing exercises, and keeping the student buoyant and happy whilst working towards this goal, is crucial. It may be done next to other technical tests, such as scales and arpeggios, or it may be worked at in complete isolation.
The reason the hand tends to collapse, making Bridge formation challenging, is generally weakness in the fourth and fifth finger; the formation of the Bridge relies on each finger having a curved, rounded stance. The fourths and fifths, or outer fingers, don’t always naturally sit on the keys in this manner, and they also tend to be side-stepped during practice, with many purposefully changing fingerings in order to not utilise these fingers. But by doing so, we are ignoring the possibilities of almost half of the hand! Surely, it’s better to develop the fourth and fifth alongside the first, second and third?
The following exercises have been beneficial to my students:
Ex. 1
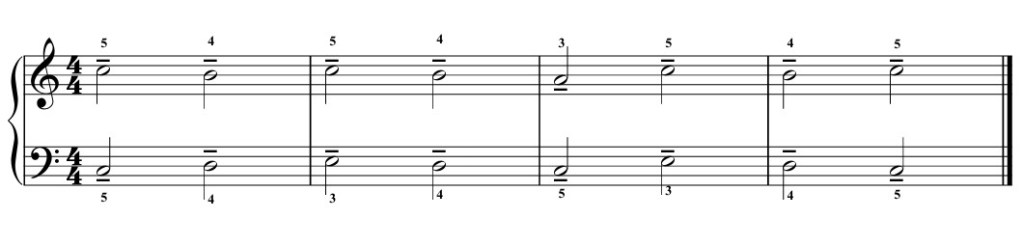
Devised for the outer fingers, this very simple note pattern allows each finger to sink into the key bed; encourage students to focus on ‘how’ fingers strike the key; depressing it using the finger-tip with a deep or firm touch (a tenuto has been added for this purpose). Try to make pianists aware of the first finger joint (the one nearest the finger-tip), which must be working and fully engaged, so that a ‘hooked’ finger shape aids finger-tip placement on the keys. This is demanding for the fourth and fifth at first, and will require short bursts of concentrated practice; too much, and there is a risk of injury. This exercise can be practised hands separately, too, in order to observe finger movement during key depression.
Aim for pupils to be made aware of the corresponding knuckle, keeping it visible, so that it can support the finger. Connection with the key is also vital; a rich sonority will only emerge as fingers learn to plunge to the depths of the key, with the help of a loose, relaxed wrist and gently oscillating arm.
Ex. 2

Ex. 2 is another simple note pattern, but by starting on the third finger, it will be acknowledged as an important ‘pivotal’ finger of the hand. In many ways, this finger provides balance within the hand, and within the fledgling Bridge position. Some teach beginners by emphasising the third finger first for this reason as opposed to the thumb, as has previously often been the case. Ask pupils to play the first three notes of Ex. 2 with their the fingertips, knuckles in place (that is, visible), moving the hand and wrist very slightly to the right, using a lateral arm movement, supporting those fingers as they play each key, on reaching the top note (C), change direction moving the hand and wrist slightly to the left, for the final four notes of the exercise. This is ensuring that every finger is supported efficiently by the hand, arm and wrist, free from tension and with a focus on the knuckles. Students eventually become accustomed to the very subtle movement required to position the knuckle optimally, and use it in conjunction with its corresponding finger. You can employ a similar exercise with the left hand, too.
When playing these note patterns, try to ensure that the wrist and hand are ‘guiding’ each finger as notes are depressed. Use a rotational wrist motion between each note; some call it a ‘wrist circle’, which is a flexible, circular movement made with the wrist, alleviating any building tension in the wrist or hand, between the notes, which can be especially useful when playing the fourth and fifth finger. The development of this movement will be vital in the slow process of instigating firmer fingers.
These exercises are simple and a good place to start. Once a suitable hand position has been developed, fingers are firmer, and more controlled. The hand will appear relaxed, resulting in happier, more confident pianists who are hopefully free from the tension caused by a potentially collapsed hand.
Read the original article, as it appears in Piano Professional, here: