
This blog post has been recently published in EPTA’s Piano Professional. EPTA is the European Piano Teachers Association. I currently write a feature technique article for this flagship UK publication. It’s the second article focusing on developing a pain free, relaxed piano technique. You can read Painless Piano Playing Part 1, here.
In my previous article, Painless Piano Playing Part 1, published in the last edition of Piano Professional, I wrote about the importance of encouraging our students to learn to release physical tension when playing the piano. The first article focused on relaxing and releasing tightness in the back, shoulders, arms, and hands. This article will highlight wrist flexibility and finger independence, featuring wrist exercises as well as those to begin developing firm fingers.
Once students have released any tension, or the building of tension in their shoulders, arms and hands in particular (which can take some time and effort), they are ready to loosen the wrists. These joints are probably the most important in the body in relation to piano playing; if wrists remain tense, then movement generally becomes an issue, making it difficult to circumnavigate the keyboard, and the hand and fingers also tend to become locked. One other complication as a result of wrist tension is the inability to produce a warm tone, as there will be a tendency to ‘hit’ the keys as opposed to ‘stroke’ or ‘caress’ them, which is possible via a flexible wrist and efficient use of the arm.
Let’s start with an exercise to loosen the wrists, which can be done away from the keyboard. Ask students to put their arms in the air in an upright position, keeping the forearm as still as possible, whilst moving the wrists with several different movements or motions. Firstly, move the wrist, and therefore the hand, up and then down several times, aiming to move from the wrist only. Secondly, move the wrists in a motion as if waving goodbye, that is, side to side, from left to right. And finally, move the wrists in a completely ‘circular’ motion, that is, rotating the hand and wrist using a circular movement, all whilst keeping the arm flexible but still. It’s advisable for the wrists to remain very loose and relaxed throughout these exercises. Such movements may seem exaggerated and unnecessary, but they do provide a clear indication to our students how the wrist can move (it’s surprising just how many pupils aren’t aware of this) and the amount of movement required to build flexibility into their technique.
Once this has been assimilated, aim to move onto the next exercise which involves the following simple five finger pattern:

It’s entirely possible to use five finger exercises with semibreves, minims or even crotchets, but the most crucial factor is that there is plenty of time to move between notes. Ask your student to play middle C with their right-hand thumb, and once the key has sounded, encourage them to ‘drop’ their hand, wrist and arm completely whilst still holding down the note. It may be prudent to hold the thumb on middle C (they can do this with their free hand) as they drop their hand (see photo 1, where I am holding my third finger), because the priority is for the note to be played and held as the wrist, hand and arm totally relax.
Photo 1

A dropped hand will probably appear with the hand and wrist in a ‘flopped’ position, below the level of the keyboard. This is NOT a position one would ever use to play the piano, it is merely an exercise to release tension. You may need to work with a student for a while before they get the hang of the necessary ‘relaxed’ feel in their arm and hand; it’s all about the ‘feeling’ of releasing muscles.
The purpose of the exercise being that the pupil’s upper body becomes accustomed to a loose and relaxed stance as they are holding the note. It’s so often the case that students will be completely locked as they play from note to note, usually without even realising that they are doing this. Therefore, one vital aspect of building a flexible approach into technique, is that the tension employed as a note is sounded must immediately ‘released’ afterwards. Such an exercise puts this concept in to action in a fairly straightforward manner, and if practised slowly and regularly, it will eventually become a habit. This exercise can be incorporated easily at the beginning of a practice session.
Students can approach every note of the five-finger exercise in this way, and then work in a similar vein with an exercise for the left hand. Care will be needed with the fourth and fifth fingers, which may ‘fall’ off notes easily at first, if not ‘held’ in place by the other hand. Flatter fingers can be helpful when attempting this exercise, and eventually students will be able to hold the note unaided, and learn to relax their upper body simultaneously.
Once this has been digested, the student should begin to feel more comfortable and suitably ‘relaxed’, so we can move on to the next exercise, which uses the same five finger pattern as printed above. The only difference will be in the approach to playing every note.
Wrist ‘circles’ are a useful technique to help students move from note to note because they generally advocate the ‘dropped’ wrist, and therefore another opportunity to release tension and relax the hand and wrist. They also offer students the chance to learn about circular wrist movement which is a prerequisite in flexible piano playing, whether moving from note to note, or using the movement to incorporate larger groups of notes, or various note patterns. For this exercise, it’s a good idea to ask students to play on their fingertips, as opposed to the flat fingered approach suggested for the earlier exercise.
Fingers occasionally have a tendency to ‘collapse’; to prevent this, ideally focus on employing a ‘hooked’ finger shape, making the sure the first joint (as shown in photo 2 by my index or second finger), is engaged as opposed to collapsing.
Photo 2

I ask students to play middle C, but this time use a complete circular movement before sounding the next note, and as the same C is held in place. To form a rotational or circular motion, as the note is held, the wrist needs to rotate from the neutral position (with the wrist aligned with the keyboard), as in photo 3, through a downward position or motion, as in photo 4, back to the neutral position, and then on to a rising position, with the wrist above the keyboard level, as in photo 5, all before returning to the neutral position and, then finally, on to playing the next note (a D). These movements are all connected via one circular movement, encouraging a loose wrist and arm, between every note, illustrating the importance of the concept of tension (which is required to play a note) and release, or letting go of that tension once the note has been played.
This rotation is quite a straightforward process, as long as the wrist is kept relaxed, and the student’s arm remains flexible. Once grasped, pupils can move through the exercise using both hands, separately.
Photo 3

Photo 4
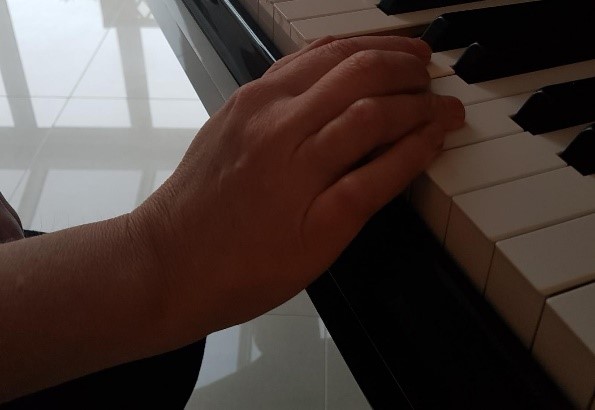
Photo 5

Once flexibility has been ‘learned’ and fully assimilated, the fingers can begin to sound each note with a deeper touch producing a full tone, playing past the double escapement to the bottom of the key, or the key bed, whilst still keeping the wrist, hand and arm light and loose. This will encourage every finger to work almost alone, that is, without the help of other fingers, but with full use of the arm, hand and wrist behind every note. This in turn, forms the basis for using the arm as a hinge, so that it can provide the appropriate weight, supported by the moveable wrist for powerful arm weight. It’s this motion which can prevent injury whilst at the same time promoting a full sonority.
To do this the wrist circles must offer a ‘swing’ feel to the single notes in the exercise, and as the finger or thumb goes to strike the note, the wrist drops the arm, and therefore the finger, ‘into’ the key, so that instead of ‘hitting’ from above, the finger caresses the note; the finger should ideally be almost resting on the key before it is played, as opposed to being ‘struck’ from above, which tends to make a less than ideal tone. Instead, the movement comes from the downward motion or ‘swing’ of the wrist and arm.
After a while, students will hopefully feel more relaxed and less tense as they move through these exercises. They will subsequently be able to move on to simple Czerny or Cramer exercises, to further develop firm fingers and wrist movement whilst increasing speed over longer phrases and note patterns.
It may take a few months of work to make progress, but it’s worth reminding pupils that it’s all about how they ‘feel’. Such exercises have little to do with piano music, but the truth is that unless pianists can move freely around the keyboard, they will not be able to play the repertoire that they choose with accuracy and confidence.
You can read the published article by clicking on the link below:
I really like all the tips of yours in this post.The way you present the information is quite amazing. Thanks for sharing valuable information. I would be amazed if you could share some reference to the best online piano lessons . I am newbie and just started learning from the web. I find it really interesting to learn online. Can you please share me some resources