
This is the second post exploring touch and articulation. The first focused on finger staccato (you can read it here), and today I’ll try to provide a few practice ideas for wrist staccato. Wrist staccato technique is generally used to play chordal passage work or groups of two notes or more in a very short, detached manner.
A pianist friend and I were chatting recently about articulation, discussing the whole gamut of staccato possibilities and variants. After a long pause my friend suddenly remarked, “what if wrist staccato doesn’t really exist – it seems to have been incorrectly labelled”. I’ve been pondering this ever since. Due to the title, it’s easy to misinterpret wrist staccato as merely the wrist in a ‘fixed’ position bobbing up and down at the end of the arm, but if this is the only physical action taken, rigidity and extreme tension will prevail. Unlike finger staccato, wrist staccato requires much more movement than just that of the wrist.
To achieve success, it really must be harnessed to a very flexible, moveable forearm, upper arm and upper torso. As with many other techniques in piano playing, each movement benefits from being cushioned and supported by other parts of the upper body. So, in this post, I will aim to describe wrist staccato, and how to achieve it as transparently as possible.
1.
As always, start with arms in a relaxed state; they should ideally feel ‘heavy’, with muscles relaxed. This is the feeling you are trying, if possible, to replicate when playing. Practice away from the piano at first; begin with the hand in its natural position, then move it upwards using the wrist only, then downwards, with your forearm remaining fairly static, the wrist acting rather like a hinge. Gradually build up speed. The faster the speed, so the motion becomes smaller and smaller, and is eventually akin to a ‘vibrato’ action, as if shaking the hand rapidly.
2.
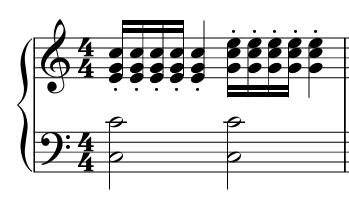
Once the basic movement has been assimilated away from the instrument, experiment by applying it to a few chords or intervals on the keyboard. A C major triad, similar to those in the example above, might be helpful. Play hands separately at first, and as you play every chord, using a large hinge-like motion with your wrist, almost like a ‘throwing’ action, land on the chord accurately using the tips of the fingers. After the chord has been struck, completely ‘release’ the wrist and arm, letting go of any tension, before the next chord is played. This is tricky to do at speed, so as always, slow practice can really help. As speed is built, be sure to release any elbow tension too, as this can feel uncomfortable after a while. To release muscles, swing your arm down by your side; this will serve as a reminder of the feeling of relaxation or no tension.
3.
In order for the arms, elbows and upper torso to remain as free and flexible as possible, so they can support the wrist, it’s important to have an in-built ‘breathing’ space between each chord or interval. Therefore, release the upper body after every single chord. The wrist and arm will eventually become accustomed to the whole tension release method. I find it useful to make a rotational movement with the wrist too (when practising slowly) as opposed to only moving up and down, because the use of some arm weight seems to cushion the movement, providing a richer sound and freer action, in preparation for brisk tempos. Some prefer a ‘throwing’ motion, the flexibility stemming from the wrist’s release between each ‘throw’ of the hand.
4.
After a while, move from playing one chord at a time, to several on one wrist motion. An example of wrist staccato, is shown below, which is the first bar of Czerny’s Study No. 40, from The Art of Finger Dexterity Op. 740:
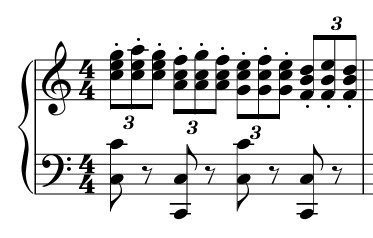
This passage might be practised in the manner suggested below, the rests providing spots to release tension. During the crotchet rests in the right hand, ensure the wrist and whole arm is loose and floppy or free, before continuing, then you will know if you have released tension successfully.

5.
Practice on passages which don’t require a large hand stretch. If octaves or big chords feel strained, choose smaller triads as in the example above. It’s important to feel comfortable, not over stretched. Also, by giving a slight accent on the first beat of a passage or group, such as in the first triad in the chordal group above, it’s possible to facilitate the movement required to play all three chords in the group with ease. The action needed for the strong beat sets the motion rolling, helps to rotate the wrist, and keeps the arm and elbow soft and light too. As the wrist and arm become used to the feeling, so the breaks between each chord can be less and less, although it is always necessary to free the wrist very swiftly between groups of chords, ridding the arm of any tension before continuing.
Speed will come eventually, when the wrist and arm feel able and willing to relax the muscles between passage work, then it will be possible to play longer sections without tiring. Once this aspect has been grasped, velocity and virtuosity will appear.